Visit Lightning AI

How to Move a Grid Project to Lightning Apps

The Evolution of Grid.ai

By Femi Ojo, Senior Support Engineer Lightning AI

Along with the launch of its flagship product Lightning, Grid.ai has rebranded to Lightning AI. This name change allows us to unify our offerings and enables us to expand support for additional products and services as we look to a future that makes it easier for you to build AI solutions. 

Prior to the new launch, Grid.ai was maintaining popular open source projects like PyTorch Lightning, PyTorch Lightning Bolts, and PyTorch Lightning Flash. This made the connection between Grid.ai and PyTorch Lightning projects a bit unclear. We felt that rebranding to Lightning as an organization would make it a lot easier for the community to understand the relationship between all of our product offerings.

For the time being, this rebranding of our corporate identity only affects our name if you use Grid; both the Grid.ai website and the Grid platform will remain unchanged. However, we highly recommend you check out the new Lightning.ai website and learn how you can use Lightning Apps to accelerate your research.

What this Means for You

Fret not, we carefully thought about the implications this has on your workflows. To this end we have spent time ensuring that transitioning from Grid.ai to Lightning Apps is a low-barrier task. The source executable script is the entry point for both Lightning Apps and Grid. However, due to the app-based nature of Lightning Apps, we have to relax our zero-code change promise to a near-zero code change promise. This relaxation allowed us to build more flexibility and freedom into the Lightning product. The shift from Grid to Lightning Apps is a simple 2 step process:

  1. Convert existing code to a Lightning App.
  2. Add a --cloud flag to your CLI invocation and optionally make minor parameter additions to customize your cloud resources.

We will discuss both of these steps in turn.

Converting Your Code to a Lightning App

To convert your code to a Lightning App is a seamless task today with some of our convenient components. Both the PopenPythonScript and TracerPythonScript components are near-zero code change solutions for converting Python code to Lightning Apps! 

Below is an example of how to do this with an image classifier model taken from the official Lightning repository.

Imports

from lightning_app.storage import Path
from lightning_app.components.python import TracerPythonScript
import lightning as L

The imports above seem simple but they are powerful and are pretty much all the core components to building a Lightning App. So let’s dive into each one of the Lightning modules.

  1. TracerPythonScript – This component allows one to easily convert existing .py files into a LightningWork. It can take any standalone .py script and convert it to the object Lightning is expecting. Even if your script requires script arguments like you normally pass with a CLI, TracerPythonScript is able to handle it.
  2. L – Is the convention for creating idiomatic Lightning Apps. From it we will import all the core features of Lightning.
    1. LightningWork – LightningWorks are the building blocks for all Lightning Apps. A LightningWork is optimized to run long running jobs and integrate third-party services.
    2. LightningFlow – LightningFlows are the managers of LightningWorks and ensure proper coordination among them. A LightningFlow runs in a never ending while loop that constantly runs checking the state of all its LightningWork components and updates them accordingly.
    3. LightningApp – this is essential to running any Lightning App. It is the entry point to instantiating the app.
  3. Path – To ensure proper data access across LightningWorks we’ve introduced the Path object. Lightning’s Path object works exactly like Pathlib.Path, enabling seamless drop-in replacements.

Define the Root Flow

Now that you’ve gotten introduced to some core features of Lightning let’s dive more into the actual code.

class CifarApp(L.LightningFlow):
    def __init__(self):
        super().__init__()
        script_path = Path(__file__).parent / "scripts/cifar_baseline.py"
        self.tracer_python_script = TracerPythonScript(script_path)

    def run(self):
        if not self.tracer_python_script.has_started:
            self.tracer_python_script.run()

Here we defined our root flow. Believe it or not this is as complicated as it gets to shift from something like a Grid Run to a Lightning App. There are also components out there to emulate the Grid Session environment in the Component Gallery but that is touched upon in our Intro to Lightning blog post, so be sure to check it out.

  1. Every object that inherits from a LightningFlow or LightningWork (not introduced here) needs to have super().__init_() in its init method.
  2. script_path – This is the path to your executable script.
  3. self.tracer_python_script – This is the work that your flow is going to run.
  4. self.has_started – This is a built in attribute of a LightningWork that is used as a flag to ensure the work only invokes the script one time.
  5. def run – This is an obligatory definition that is called when you run the app.

Finally, it’s time to reveal the last line needed to have a fully functioning Lightning App.

Fully Forming the Lightning App

app = LightningApp(CifarApp())

As stated before, LightningApp is the entrypoint when you run lightning run app app.py. It takes a flow object as its parameter argument.

See here for all the code changes required to do this with the TracerPythonScript component.

Testing Locally

To test your Lightning App locally all you have to do is run the following command from the directory containing your app.

lightning run app <filename>.py

Notice here that the file name can be anything for running a Lightning App. However, it is considered idiomatic for the filename to be app.py.

Shifting to Cloud

Shifting to the cloud is as simple as adding a --cloud to your CLI invocation when you deploy the application. As a complete example to execute our CIFAR training code on the cloud this is what we would run.

lightning run app app.py --cloud

A few things will happen to users that choose this option. 

  1. All your LightningWorks will be run on a separate cloud instance.
  2. By default, Lightning will place your works on the least powerful CPU offered by Lightning AI, free of cost.
  3. The compute used by Lightning is customizable into tiers. These are specified via the CloudCompute argument. This is explained in the documentation below.

For more advanced or customized deployments see our Docker + requirements documentation and our customizing cloud resources documentation.

Note: At this time not all the features supported in Grid are supported in Lightning Apps. We encourage you to read the Intro to Lightning blog post to learn more about what features are on the roadmap to be supported.

Get started today. We look forward to seeing what you #BuildWithLightning!

Creating Datastores

Overview of Datastores

To speed up training iteration, you can store your data in a Grid Datastore. Datastores are high-performance, low-latency, versioned datasets. If you have large-scale data, Datastores can resolve blockers in your workflow by eliminating the need to download the large dataset every time your script runs.

Datastores can be attached to Runs or Sessions, and they preserve the file format and directory structure of the data used to create them. Datastores support any file type, with Grid treating each file as a collection of bytes which exist with a particular name within a directory structure (e.g. ./dir/some-image.jpg).

Why Use Datastores?

Data plays a critical role in everything you run on Grid, and our Datastores create a unique optimization pipeline which removes as much latency as possible from the point your program calls with open(filename, 'r') as f: to the instant that data is provided to your script. You’ll find traversing the data directory structure in a Session indistinguishable from the experience of cd-ing around your local workstation.

  • Datastores are backed by cloud storage. They are made available to compute jobs as part of a read-only filesystem. If you have a script which reads files in a directory structure on your local computer, then the only thing you need to change when running on Grid is the location of the data directory!
  • Datastores are a necessity when dealing with data at scale (e.g., data which cannot be reasonably downloaded from an HTTP URL when a compute job begins) by providing a singular & immutable dataset resource of near unlimited scale.

In fact, a single Datastore can be mounted into tens or hundreds of concurrently running compute jobs in seconds, ensuring that no expensive compute time is wasted waiting for data to download, extract, or otherwise “process” before you can move on to the real work.

A couple of notes:

  1. Grid does not charge for data storage.
  2. In order to ensure data privacy & flexibility of use, Grid never attempts to process the contents of the files or infer/optimize for any particular usage behaviors based on file contents.

How Data is Accessed in a Datastore?

By default, Datastores are mounted at /datastores/<datastore-name>/ in both Runs and Sessions. If you need the mount path at a different location, you are able to manually specify the Datastore mount path using the CLI.

How to Create Datastores

Datastores can be created from a local filesystem, public S3 bucket, HTTP URL, Session, and Cluster.

Local Filesystem (i.e. Uploading Files from a Computer)

There are a couple of options when uploading from a computer depending on the size of your dataset.

Small Dataset

You can use the UI to create Datastores for datasets smaller than 1GB (files or folder). When Datastore sizes are greater than 1GB, you’ll reach the browser limit for uploading data. In these situations, you should use the CLI to create Datastores.

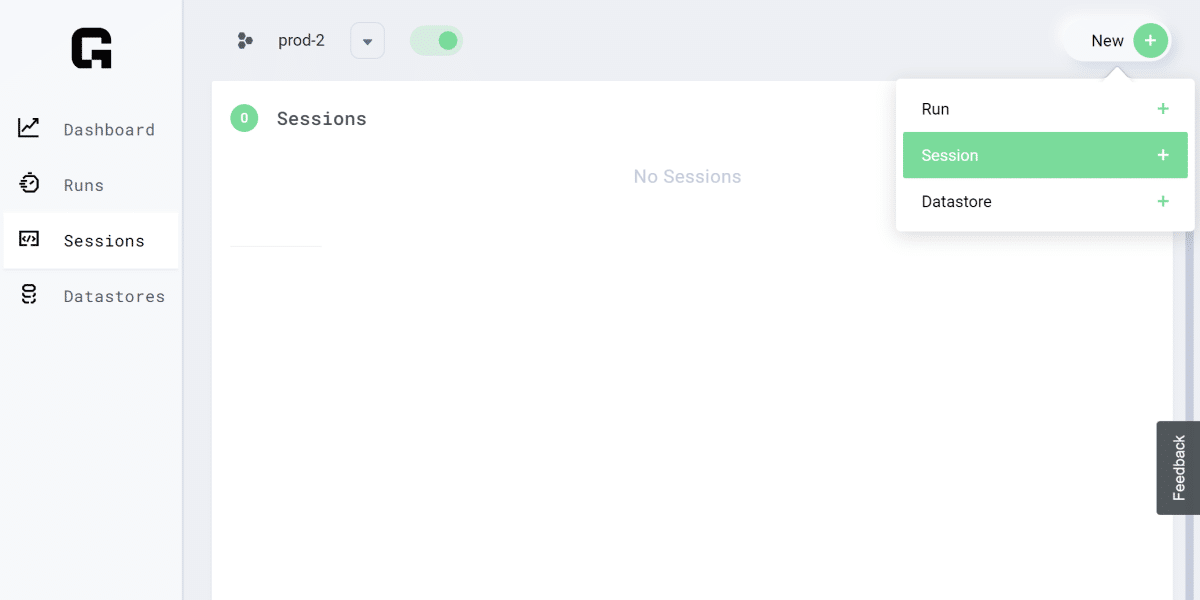
From the Grid UI, you can create a Datastore by selecting the New button at the top right where you can then choose the Datastore option.

New Datastore

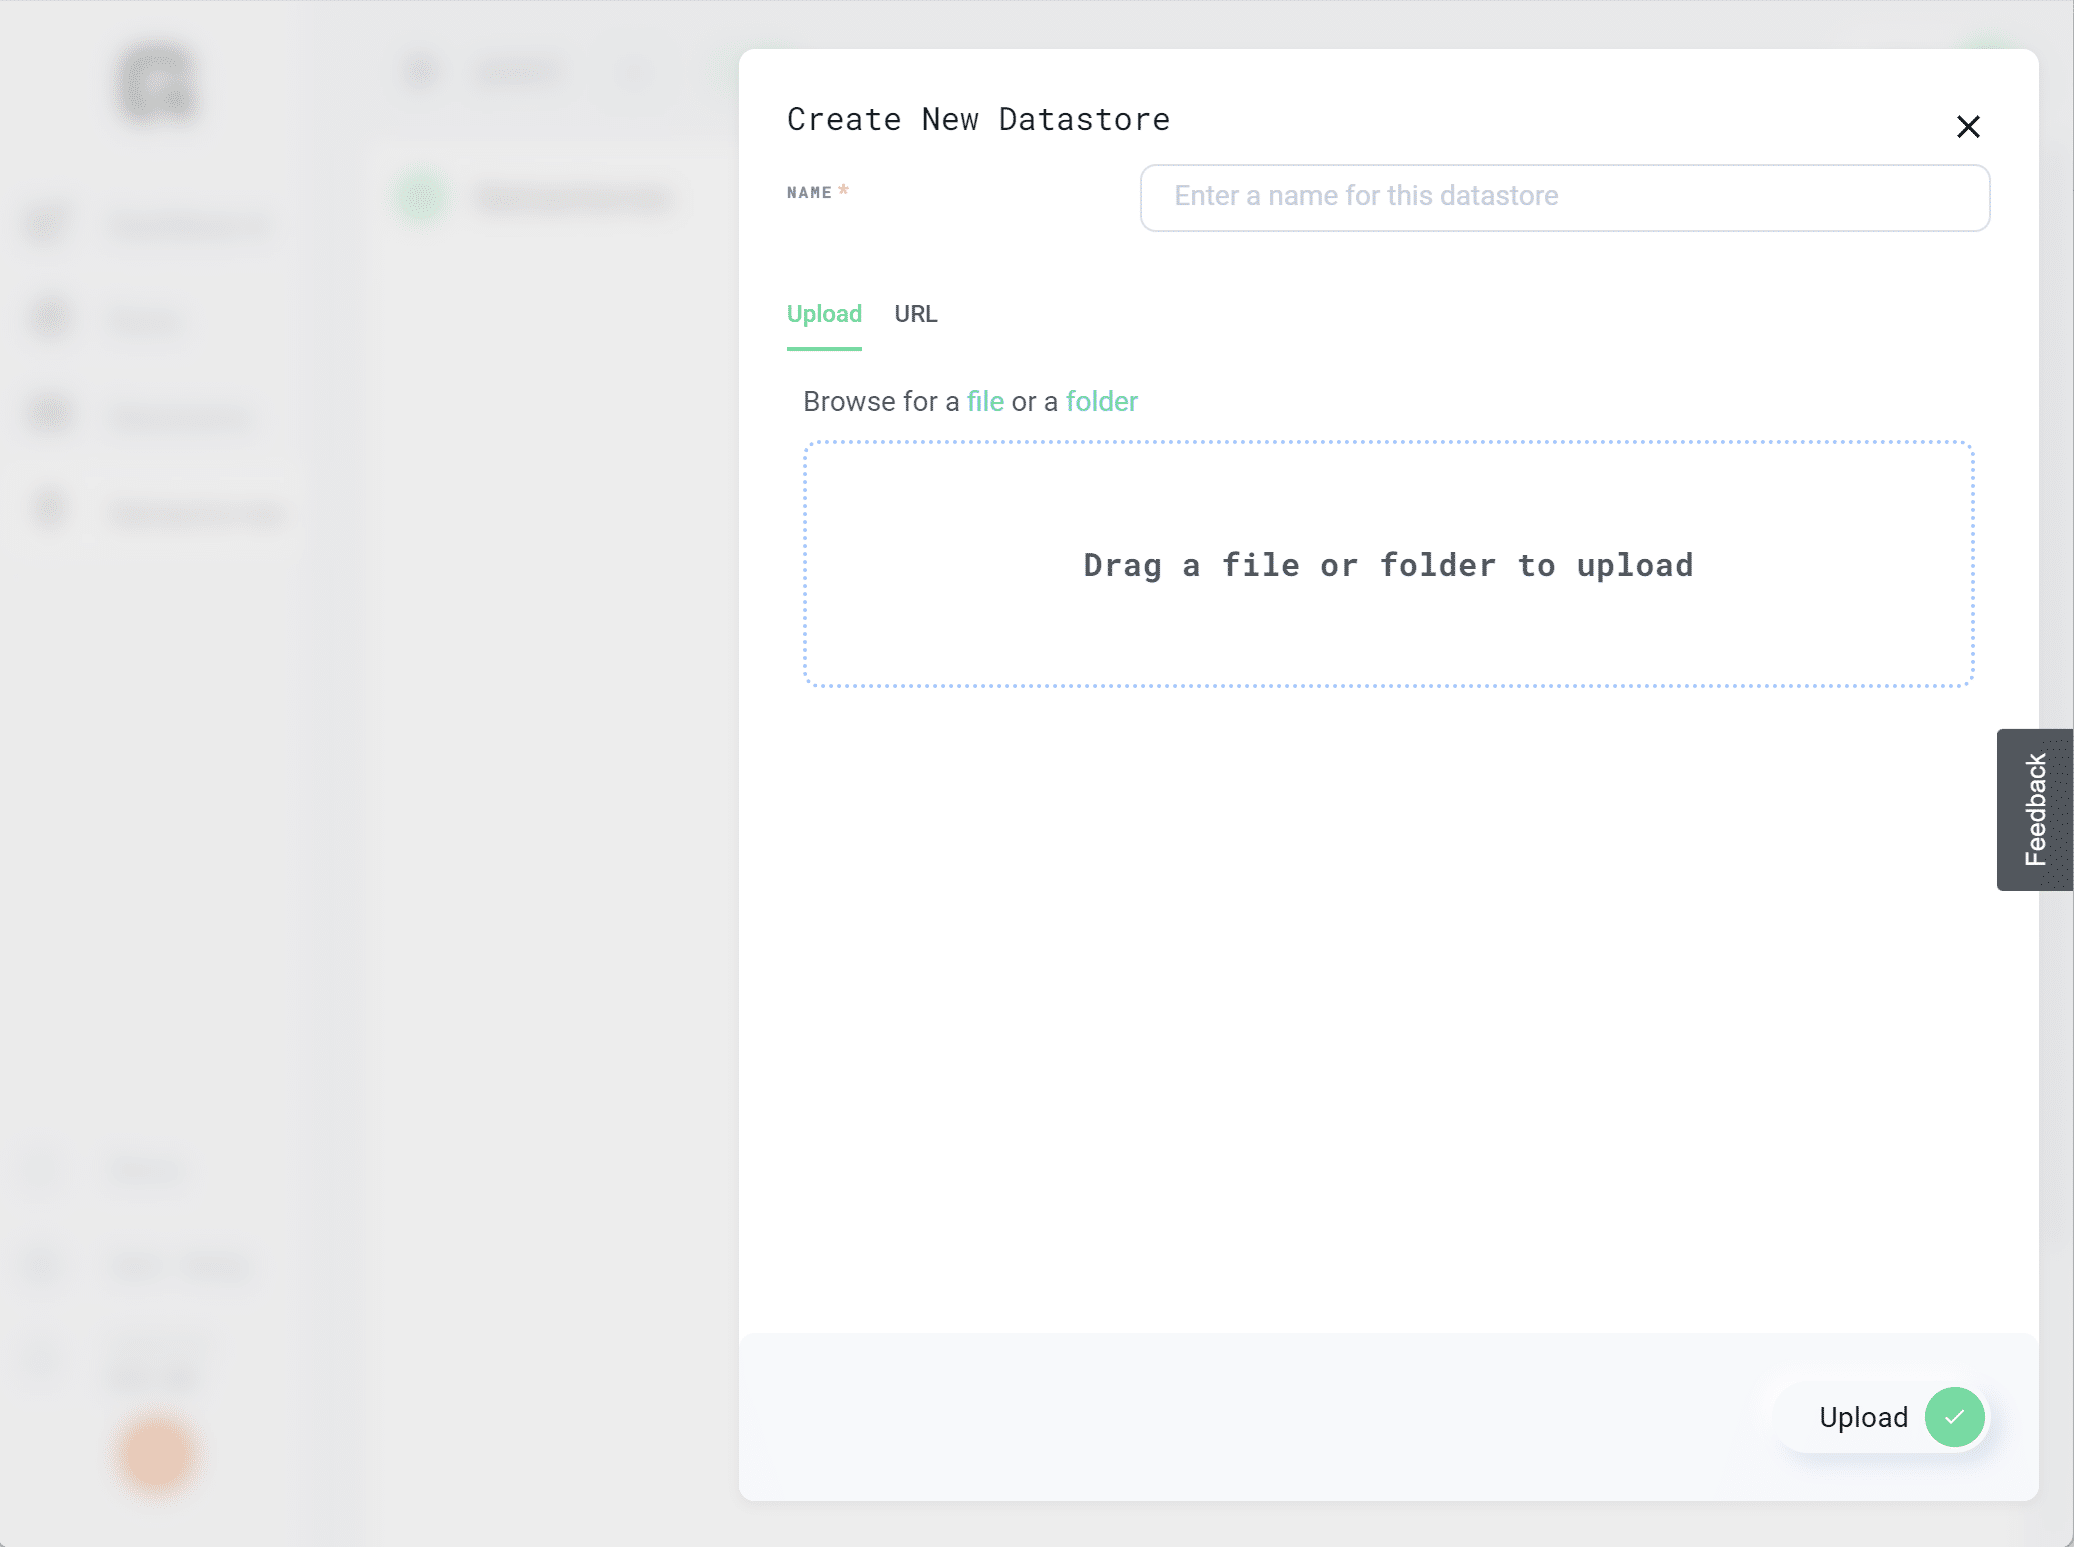
The Create New Datastore window will open and you will have the following customization options:

  • Name
  • Options to upload a dataset or link using a URL

Create New Datastore window

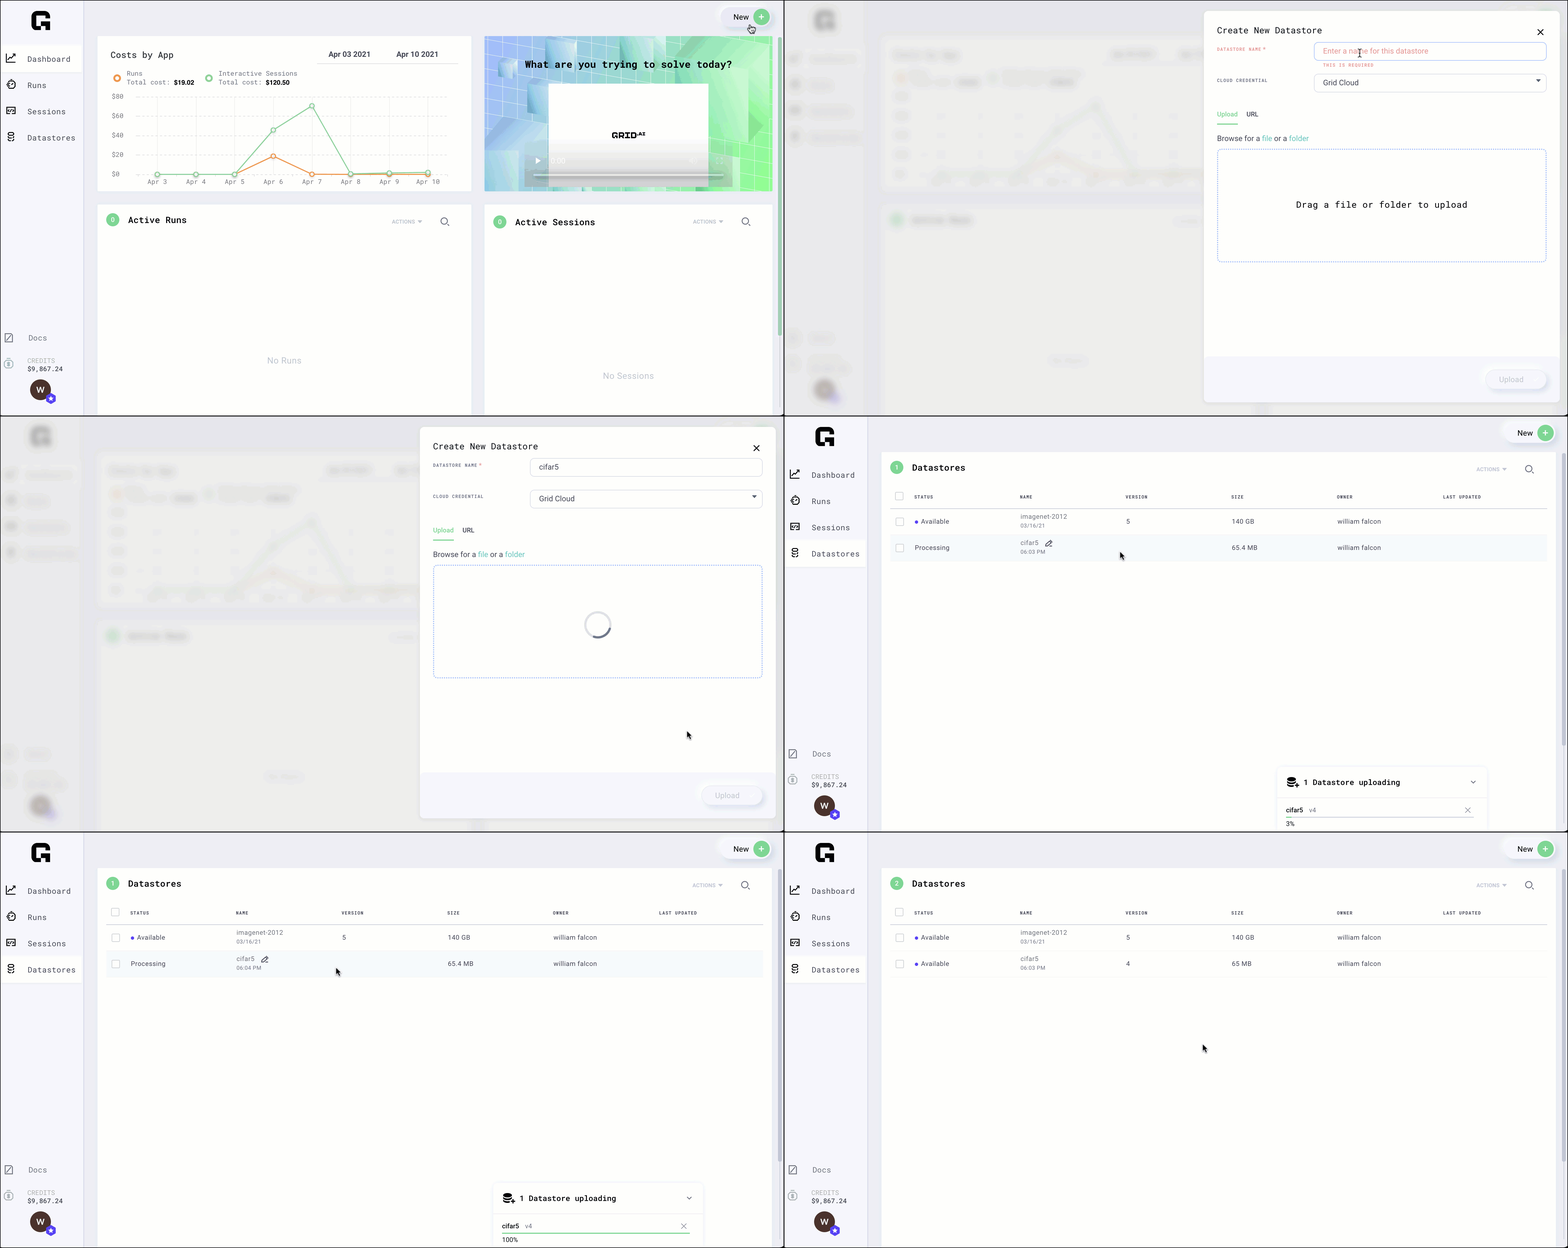
To upload a dataset under 1GB, select the file or folder and click upload, or drag and drop it into the box.

When you have finished with your customizations, select the Upload button at the bottom right to create your new Datastore.

Create Datastore from small dataset

Large Datasets (1 GB+)

For datasets larger than 1 GB, you should use the CLI (although the CLI can also be used on small datasets just as easily!).

First, install the grid CLI and login:

pip install lightning-grid --upgrade
grid login

Next, use the `grid datastore` command to upload any folder:

grid datastore create --name imagenet ./imagenet_folder/

This method works from:

  • A laptop.
  • An interactive session.
  • Any machine with an internet connection and Grid installed.
  • A corporate cluster.
  • An academic cluster.

Create from a Public S3 Bucket

Any public AWS S3 bucket can be used to create Datastores on the Grid public cloud or on a BYOC (Bring Your Own Credentials) cluster by using the Grid UI or CLI. 

Currently, Grid does not support private S3 buckets.

Using the UI

Click New –> Datastore and choose “URL” as the upload mechanism. Provide the S3 bucket URL as the source.

Using the CLI

In order to use the CLI to create a datastore from an S3 bucket, we simply need to pass an S3 URL in the form s3://<bucket-name>/<any-desired-subpaths>/ to the grid datastore create command.

For example, to create a Datastore from the ryft-public-sample-data/esRedditJson bucket we simply execute:

grid datastore create s3://ryft-public-sample-data/esRedditJson/

This will copy the files from the source bucket into the managed Grid Datastore storage system.

In this example, you’ll see the --name option in the CLI command was omitted. When the --name option is omitted, the datastore name is assigned the name of the last “directory” making up the source path. So, in the case above, the Datastore would be named “esredditjson” (the name is converted to all lowercase ASCII non-space characters).

To use a different name, simply override the implicit naming by passing the --name option / value parameter explicitly. For example, to create a Datastore from this bucket named “lightning-train-data” use the following command to execute:

grid datastore create s3://ryft-public-sample-data/esRedditJson/ --name lightning-train-data

Using the –no-copy Option via the CLI

In certain cases, your S3 bucket may fit one (or both) of the following criteria:

  1. the bucket is continually updating with new data which you want included in a Grid Datastore
  2. the bucket is particularly large (leading to long Datastore creation times)

In these cases, you can pass the --no-copy flag to the grid datastore create command.

Example:

grid datastore create S3://ruff-public-sample-data/esRedditJson --no-copy

This allows you to directly mount public S3 buckets to a Grid Datastore, without having Grid copy over the entire dataset. This offers better support for large datasets and incremental update use cases.

When using this flag, you cannot remove files from your bucket. If you’d like to add files, please create a new version of the Datastore after you’ve added files to your bucket.

If you are using this flag via the Grid public cloud, then the source bucket should be in the AWS us-east-1 region or there will be significant latency when you attempt to access the Datastore files in a Run or Session.

Create from an HTTP URL

Datastores can be created from a .zip or .tar.gz file accessible at an unauthenticated HTTP URL. By using an HTTP URL pointing to an archive file as the source of a Grid Datastore, the platform will automatically kick off a (server-side) process which downloads the file, extracts the contents, and sets up a Datastore file directory structure matching the extracted contents of the archive.

Using the UI

Click New –> Datastore and choose “URL” as the upload mechanism. Provide the HTTP URL as the source.

From the CLI

In order to use the CLI to create a datastore from an HTTP URL, we simply need to pass a URL which begins with either http:// or https:// to the grid datastore create command.

For example, to create a datastore from the the MNIST training set at: https://datastore-public-bucket-access-test-bucket.s3.amazonaws.com/subfolder/trainingSet.tar.gz we simply execute:

grid datastore create https://datastore-public-bucket-access-test-bucket.s3.amazonaws.com/subfolder/trainingSet.tar.gz

In this example, you’ll see the --name option in the CLI command was omitted. When the --name option is omitted, the Datastore name is assigned from the last path component of the URL (with suffixes stripped). In the case above, the Datastore would be named “trainingset” (the name is converted to all lowercase ASCII non-space characters).

To use a different name, simply override the implicit naming by passing the --name option explicitly. For example, to create a datastore from this bucket named “lightning-train-data” use the following command to execute:

grid datastore create https://datastore-public-bucket-access-test-bucket.s3.amazonaws.com/subfolder/trainingSet.tar.gz --name lightning-train-data

Create from a Session

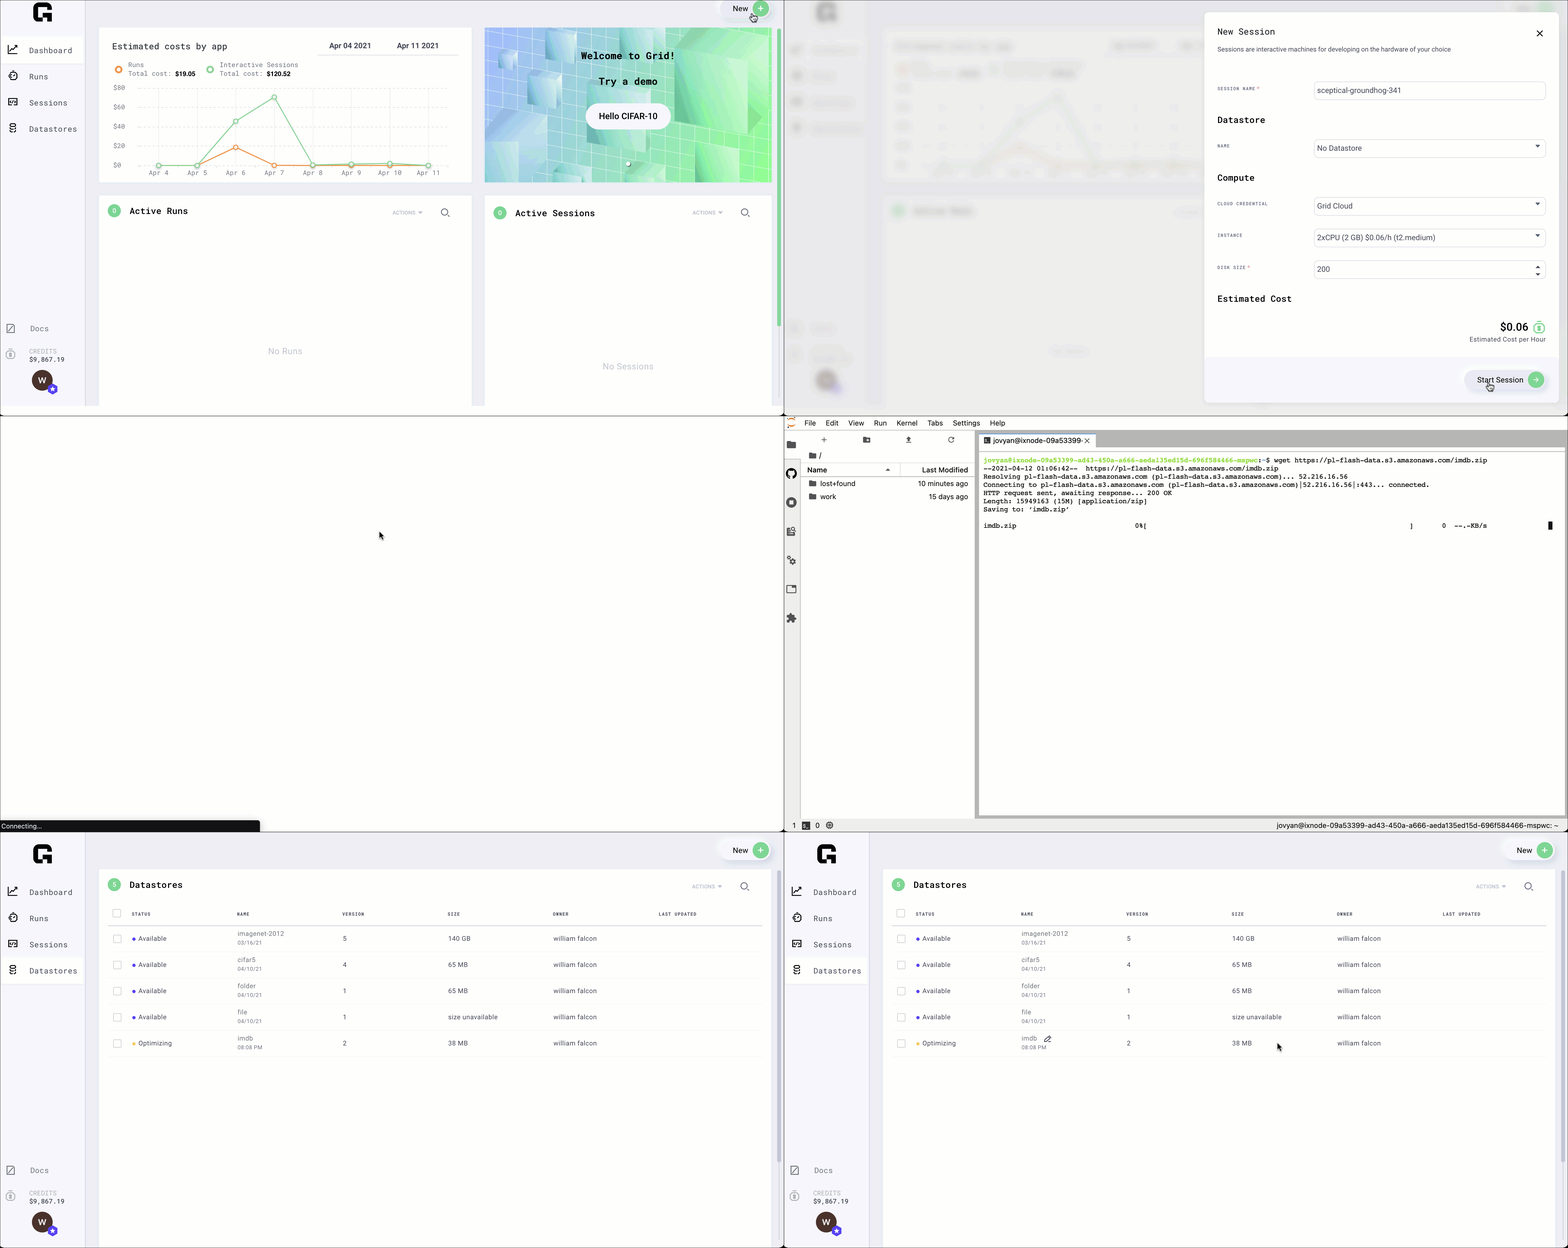
For large datasets that require processing or a lot of manual work, we recommend this flow:

  1. Launch an Interactive Session
  2. Download the data
  3. Process it
  4. Upload

Create Datastore from Session

When you are in the interactive Session, use the terminal multiplexer Screen to make sure you don’t interrupt your upload session if your local machine is shut down or experiences network interruptions.

# start screen (lets you close the tab without killing the process)
screen -S some_name

Now do whatever processing you need:

# download, etc...
curl http://a_dataset
unzip a_dataset

# process
do_something
something_else
bash process.sh
...

When you’re done, upload to Grid via the CLI (on the Interactive Session):

grid datastore create imagenet_folder --name imagenet

The Grid CLI is auto-installed on sessions and you are automatically logged in with your Grid credentials.

Note: If you have a Datastore that is over 1GB, we suggest creating an Interactive Session and uploading the Datastore from there. Internet speed is much faster in Interactive Sessions, so upload times will be shorter.

Create from a Cluster

Grid also allows you to upload from:

  • A corporate cluster.
  • An academic cluster.

First, start screen on the jump node (to run jobs in the background):

screen -S upload

If your jump node allows a memory-intensive process, then skip this step. Otherwise, request an interactive machine. Here’s an example using SLURM:

srun --qos=batch --mem-per-cpu=10000 --ntasks=4 --time=12:00:00 --pty bash

Once the job starts, install and log into Grid (get your username and ssh keys from the Grid Settings page).

# install
pip install lightning-grid --upgrade

# login
grid login --username YOUR_USERNAME --key YOUR_KEY

Next, use the Datastores command to upload any folder:

grid datastore create ./imagenet_folder/ --name imagenet

You can now safely close your SSH connection to the cluster (the screen will keep things running in the background).

And that’s it for creating Datastores in Grid! You can check out other Grid tutorials, or browse the Grid Docs to learn more about anything not covered in this tutorial.

As always, Happy Grid-ing!

Creating Sessions

Overview of Sessions

For prototyping, debugging, or analyzing, sometimes you need a live machine you can access from your laptop or desktop. We call accessing these machines Sessions.

Sessions provide a pre-configured environment in the cloud which allows you to prototype faster on the same hardware used to scale your model through Runs. You pay only for the compute you need in order to get a baseline operational, and you can easily pause and resume so you don’t accidentally run up costs overnight or during the weekend.

What can Sessions do?

Sessions are a favorite feature of many Grid users They allow you to do the following:

  • Change machine instance type
  • Use Spot Instance
  • Mount multiple GPUs
  • Auto-mount Datastores
  • Work with pre-installed JupyterLab
  • SSH access
  • Visual Studio Code access
  • Pause the session to save work and minimize expenses
  • Resume where you left off

How to Create a Session

A new Session can be created through either the UI or CLI.

Using the UI

From the Grid UI, you can create a Session by selecting the New button at the top right, where you can then choose the Sessions option.

New Session

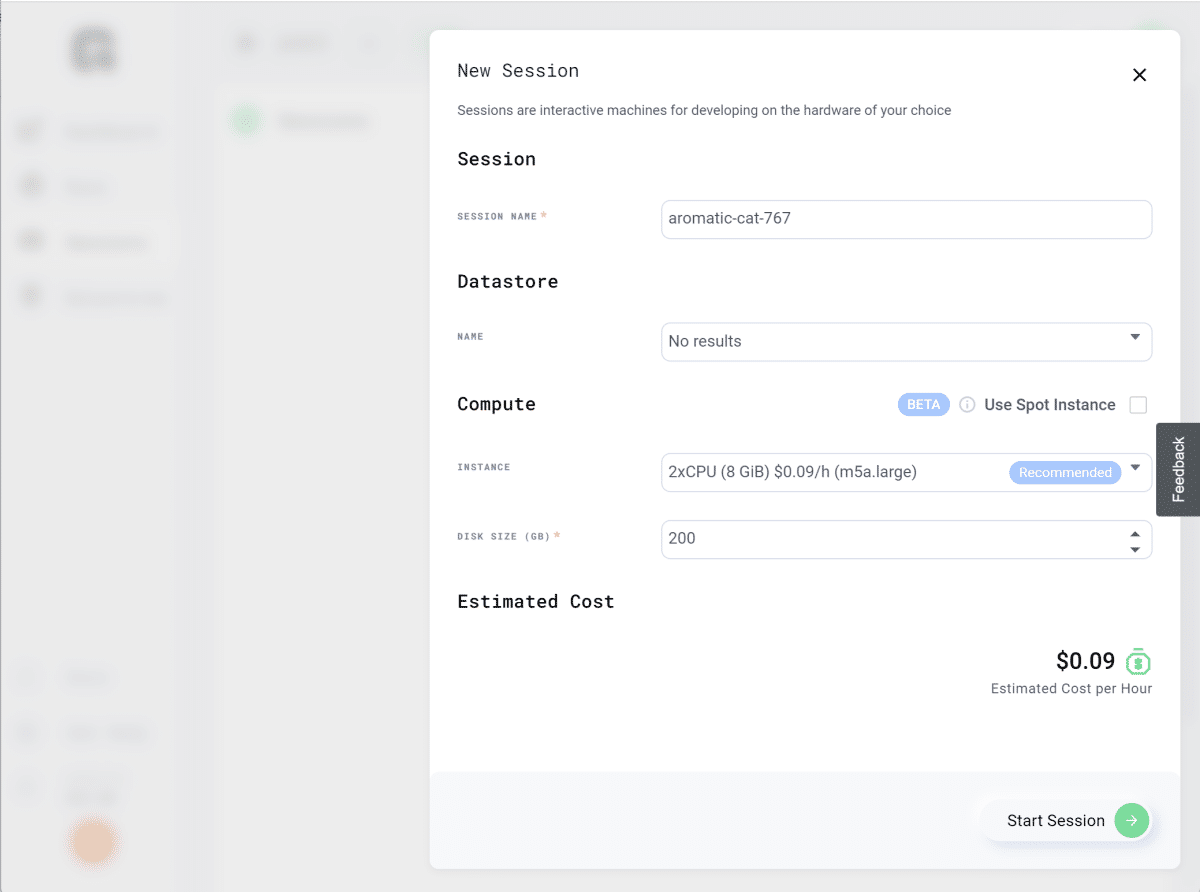
The New Session window will open and you will have the following customization options:

  • Session
  • Datastore
  • Compute

New Session Window

Session

The SESSION NAME is auto-generated, but you can change it if you prefer.

Datastore

If you’ve created one or more Datastores, you can then select the one you want to use from the NAME dropdown.

Compute

Now it’s time to select the INSTANCE you want to use.

This is the pre-configured cloud hardware available to you. A 2x CPU system will be used by default, but you can browse from other selections in the dropdown that include a variety of GPU instances and systems with up to 96x CPUs. Deciding which one to select will just be a question of estimated cost and how long it can take for your Session to complete. 

If you have a large Datastore and expect your Session to take a large amount of time to complete, you can consider a GPU instance to get it done faster (this is ideal for processing audio, images and video). Keep in mind that you will need to add a credit card in order to select a GPU instance since the cost to run these are higher than a CPU instance.

If your job can support being interrupted at any time (i.e. fine tuning, or a model that can be restarted), then you can enable Use Spot Instance to lower training and development costs.

Finally, you can adjust the DISK SIZE (GB). By default, this is set to 200GB. Disk size is what you want to allocate to the Session in GB (Gigabytes). Increasing this number allows you more space for storing artifacts, downloaded files, and other project data, although the default setting is generally fine to use in many cases.

When you have finished with your customizations, select the Start Session button at the bottom right.

Using the CLI

You can also create a new Session using the CLI with the command:

grid session create

For example, the CLI command for the default INSTANCE Session is:

# session with default 2x CPU
grid session create --instance_type m5a.large

You can find more details on using the CLI to adjust Session settings here.

Note: If you want to change the instance type while running a Session, you will need to first pause the Session.

Viewing a List of Sessions

Once you’ve created a Session, you can view it in the Sessions window by clicking on Sessions from the left navigation menu.

This view shows you both running and paused Sessions.

List Sessions

In the CLI you can list sessions with:

grid session

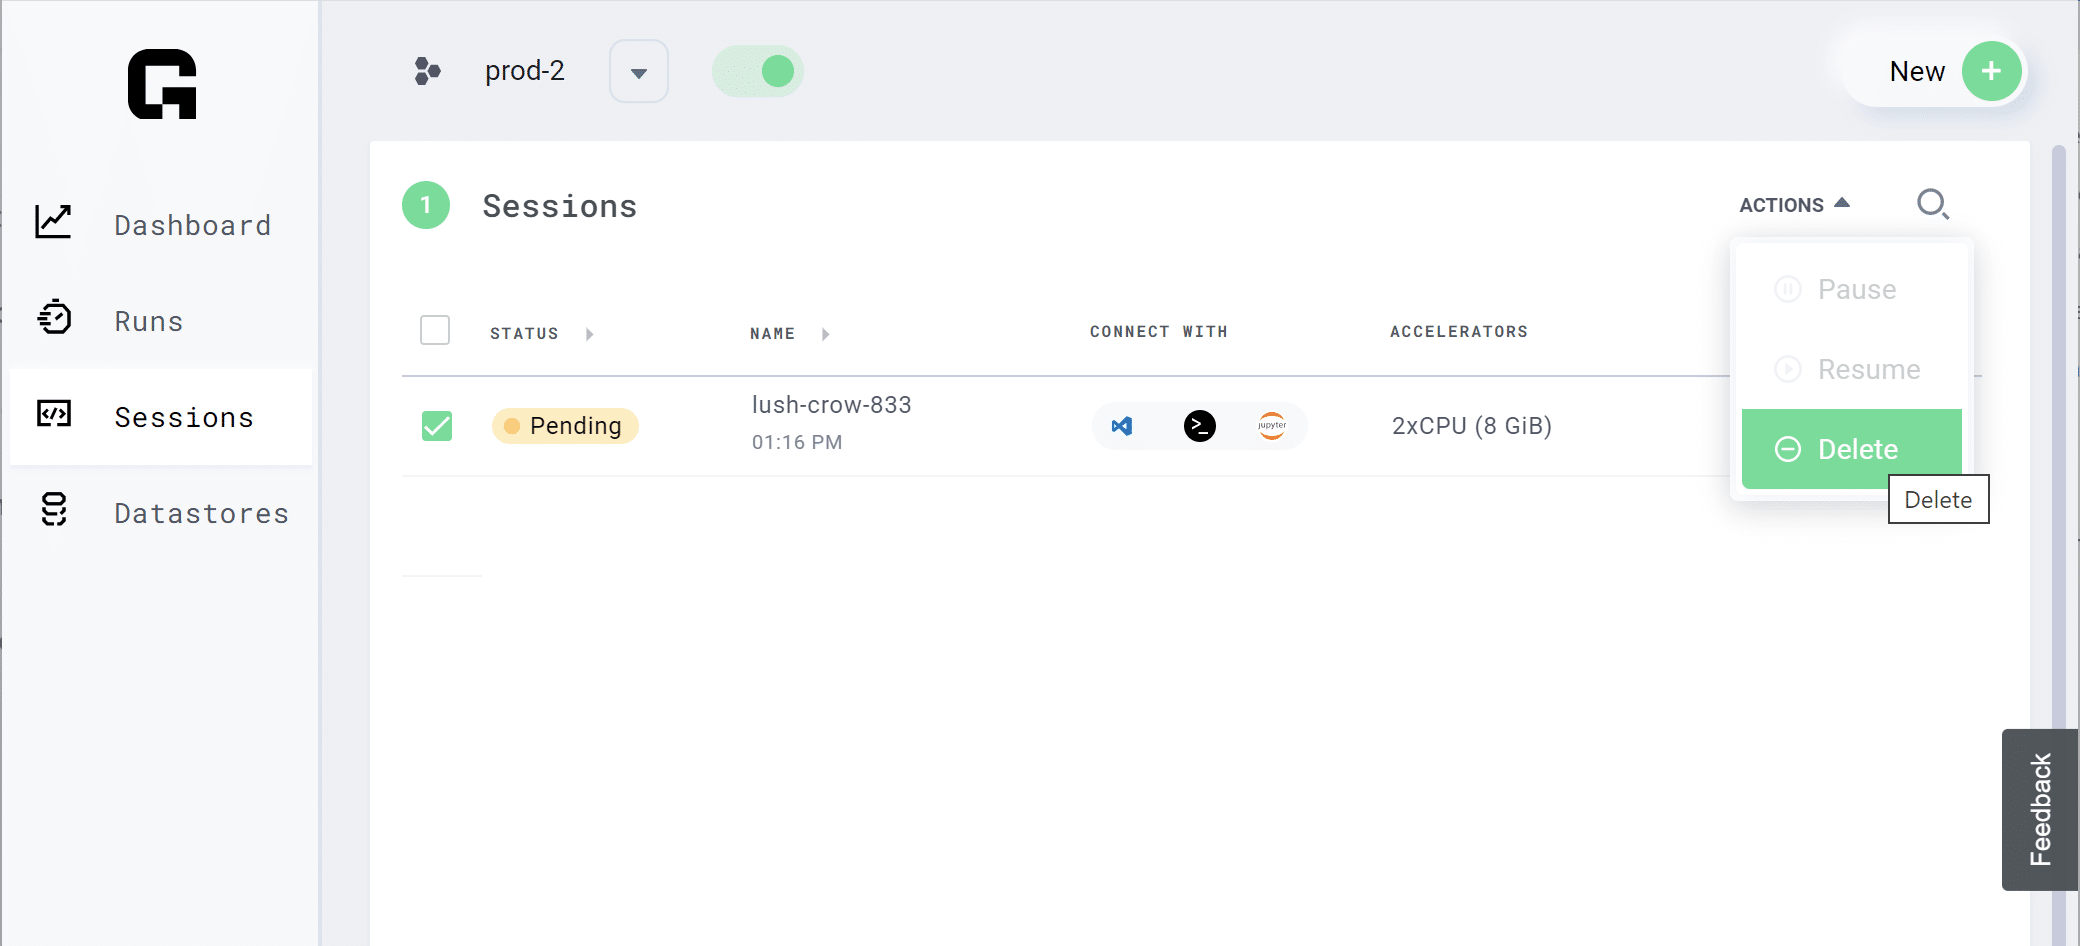
In the List view, you can use the checkboxes to select one or more Sessions, and then use the options in the ACTIONS dropdown at the top right to either Pause, Resume or Delete the selections.

Delete Session

If you are using the CLI, you can pause, resume and delete Sessions using the following commands:

Pause

grid session pause GRID_SESSION_NAME

Resume

grid session resume GRID_SESSION_NAME

Delete

grid session delete GRID_SESSION_NAME

And that’s it for creating Sessions in Grid! You can check out other Grid tutorials, or browse the Grid Docs to learn more about anything not covered in this tutorial.

As always, Happy Grid-ing!

Introduction to PyTorch

A StatQuest Tutorial

PyTorch is one of the most popular tools for making Neural Networks. This StatQuest walks you through a simple example of how to use PyTorch one step at a time. By the end of this StatQuest, you’ll know how to create a new neural network from scratch, make predictions and graph the output, and optimize a parameter using backpropagation. BAM!!!

Fill out the form here and I will send you an email to download the code demonstrated in this tutorial video (a handy little Jupyter Notebook)!

Download Tutorial Code

Creating Runs & Attaching Datastores

Overview of Runs

When you’re ready to train your models at scale, you can use Runs. A Run is a collection of experiments.

Runs allow you to scale your machine learning code to hundreds of GPUs and model configurations without needing to change a single line of code. Grid Runs support all major machine learning frameworks, enabling full hyperparameter sweeps, native logging, artifacts, and Spot Instances all out of the box without the need to modify a single line of machine learning code.

Runs are “serverless”, which means that you only pay for the time your scripts are actually running. When running on your own infrastructure, this results in massive cost savings.

Grid Runs respect the use of .ignore files, which are used to tell a program which files it should ignore during execution. Grid gives preference to the .gridignore file. In the absence of a .gridignore file, Grid will concatenate the .gitignore and .dockerignore files to determine which files should be ignored. When creating a run, you do not have to provide these files to the CLI or UI – they are just expected to reside in the project root directory.

Note: The examples used in this tutorial assume you have already installed and set up Grid. If you haven’t done this already, please visit The First TIme You Use Grid to learn more. 

How to Create Runs

Runs are customizable and provide serverless compute. Here, we cover all available methods to customize Runs for any specific use case. The examples in this tutorial cover the following:

  1. Creating vanilla Runs
  2. Creating Runs with script dependencies
    1. Handling requirements
    2. Runs with specified requirements.txt
    3. Runs with specified environment.yml
  3. Attaching Datastores to Runs
  4. Interruptible Runs

Creating Vanilla Runs

A “vanilla” Run is a basic Run that only executes a script. This hello_world repo will be used in the following example.

git clone https://github.com/PyTorchLightning/grid-tutorials.git
cd features-intro/runs
grid run --name hello hello.py

The above code is passing a script named hello.py to the Run. The script will print out ‘hello_world’.

For instructions on how to view logs, check out viewing logs produced by Runs.

Creating Runs with Script Dependencies

If you’ve taken a look at the grid-tutorials repo, you may have noticed three things:

  1. It has a requirements.txt in the root directory
  2. There is a directory called “pip”
  3. There is a directory called “conda”

Let’s quickly discuss how Grid handles requirements before touching on each of these topics.

Handling Requirements

Any time you create a Run, Grid attempts to resolve as many dependencies as it can automatically for you. Nested requirements are not currently supported.

We do, however, recommend that your projects have a requirements.txt file in the root.

Runs with Specified requirements.txt

Runs allow you to specify which requirements.txt you want to use for package installation. This is especially useful when your directory isn’t ordered in such a way that the requirements.txt resides at the root project level, or if you have more than one requirements.txt file. 

In these cases, you can use the below example as a template for specifying which requirements.txt file should be used for package installation.

git clone https://github.com/PyTorchLightning/grid-tutorials.git
cd features-intro/runs
grid run --name specified-requirements-pip --dependency_file ./pip/requirements.txt hello.py

You may have noticed that we did something different here than in prior examples: we used the --dependency_file flag. This flag tells Grid what file should be used for package installation in the Run.

Runs with Specified environment.yml

Runs allow you to specify the environment.yml you want to use for package installation. This is the only way to get Runs to use the Conda package manager without using a config file. 

When running on a non-Linux machine, we recommend using conda env export --from-history before creating a Run, as mentioned in the official Conda documentation. This is because conda export will output dependencies specifically for your operating system. 

You can use the example below as a template for specifying which environment.yml file should be used for package installation:

git clone https://github.com/PyTorchLightning/grid-tutorials.git
cd features-intro/runs
grid run --name specified-requirements-conda --dependency_file ./conda/environemnt.yml hello.py

Attaching Datastores to Runs

To speed up training iteration time, you can store your data in a Grid Datastore. Datastores are high-performance, low-latency, versioned datasets. If you have large-scale data, Datastores can resolve blockers in your workflow by eliminating the need to download the large dataset every time your script runs. 

If you haven’t done so already, create a Datastore from the cifar5 dataset using the following commands:

# download
curl https://pl-flash-data.s3.amazonaws.com/cifar5.zip -o cifar5.zip
# unzip
unzip cifar5.zip
grid datastore create cifar5/ --name cifar5

Now let’s mount this Datastore to a Run:

git clone https://github.com/PyTorchLightning/grid-tutorials.git
cd features-intro/runs
grid run --name attaching-datastore --datastore_name cifar5 --datastore_version 1 datastore.py --data_dir /datastores/cifar5/1

This code passes a script named datastore.py to the Run. The script prints the contents of the Datastore to the root directory. You should see the following output in your stdout logs:

['test', 'train']

Interruptible Runs

Interruptible Runs powered by spot instances are 50-90% cheaper than on-demand instances, but they can be interrupted at any time if the machine gets taken away. Here is how you launch a Run with spot instances:

grid run --use_spot train.py

What happens to your models if the Run gets interrupted? 

Grid keeps all the artifacts that you saved during training, including logs, checkpoints and other files. This means that if you write your training script such that it periodically saves checkpoint files with all the states needed to resume your training, you can restart the Grid Run from where it was interrupted:

grid run --use_spot train.py --checkpoint_path "https://grid.ai/url/to/ckpt"

Writing the logic for checkpointing and resuming the training loop correctly, however, can be difficult and time consuming. 

PyTorch Lightning removes the need to write all this boilerplate code. In fact, if you implement your training script with PyTorch Lightning, you will have to change zero lines of code to use interruptible Runs in Grid. All you have to do is add the --auto-resume flag to the grid run command and to make your experiments fault-tolerant:

grid run --use_spot --auto_resume train.py

If this Run gets interrupted, PyTorch Lightning will save a fault-tolerant checkpoint automatically, Grid will collect it, provision a new machine, restart the Run for you and let PyTorch Lightning restore the training state where it left off. Mind-blowing! Learn more about auto-resuming experiments in Grid or the fault-tolerance feature in PyTorch Lightning.

And that’s it! You can check out other Grid tutorials, or browse the Grid Docs to learn more about anything not covered in this tutorial.

As always, Happy Grid-ing!

The First Time You Use Grid

How To Sign In and Get Set Up


You’ve decided to give Grid a try. Awesome! What do you do now?

This quick walkthrough will show you the steps you need to take in order to get up and running.

  1. Sign up for Grid
  2. Install dependencies
  3. Log into Grid
  4. Integrate with GitHub

Step 1: Sign up for Grid


Register an account on the Grid platform here (you also will receive $25 in free credit!):

https://platform.grid.ai/

Step 2: Install Dependencies


Note: Using the Sessions feature in Grid allows you to skip this step.

Install Python

Make sure you have Python installed (Grid requires Python 3.8 or higher). You can download and install Python here:

https://www.python.org/downloads/

The following steps will install the Grid CLI tool. Grid commands can then be executed by running grid <grid command> <grid command parameters>

  1. pip install lightning-grid --upgrade

Install SSHFS

Windows Users

If you are using Windows, we suggest taking a look at WSL (Windows Subsystem for Linux). You can find more details and installation instructions here:

https://docs.microsoft.com/en-us/windows/wsl/about

Linux Users

Install sshfs Linux (Debian/Ubuntu)

sudo apt-get install sshfs

Mac Users

Mac Users should install sshfs MacOS. This is dependent on MacFuse and will yield an error with a vanilla brew install. See here for resolution.

Step 3: Log into Grid


To log into your Grid account:

  1. Visit https://platform.grid.ai/
  2. Sign in/create an account
  3. Click your user profile icon
  4. Click ‘Settings’
  5. Click the ‘API Keys’ tab

This will provide you with the command necessary to login to Grid via CLI. Once the command is run you will be able to interact with Grid via the CLI commands. See https://docs.grid.ai/cli/api for our official CLI documentation.

Viewing login credentials

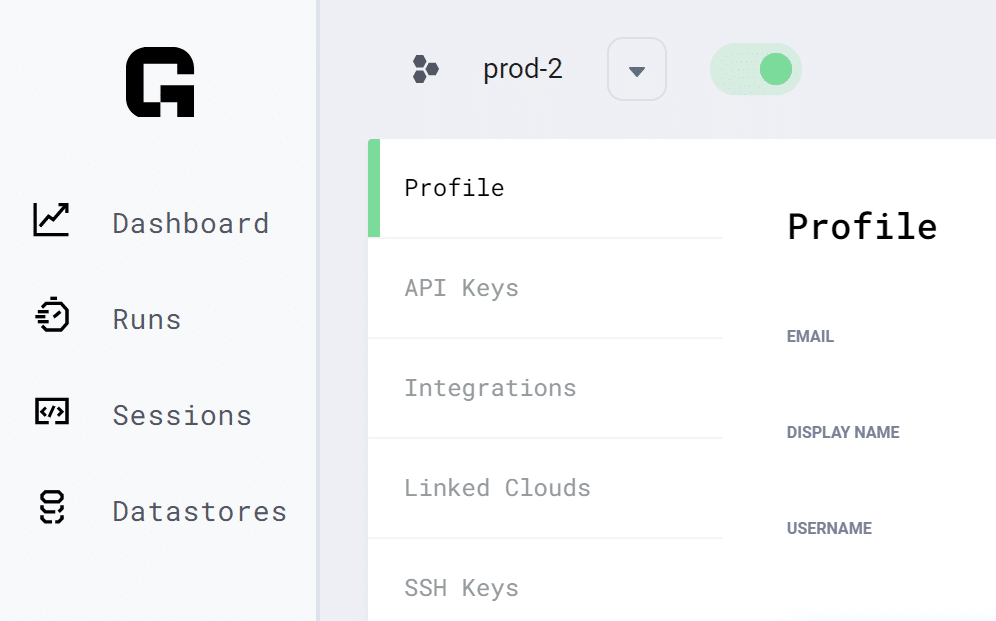
Your login credentials, API key, and ssh keys can be found on the Settings page.

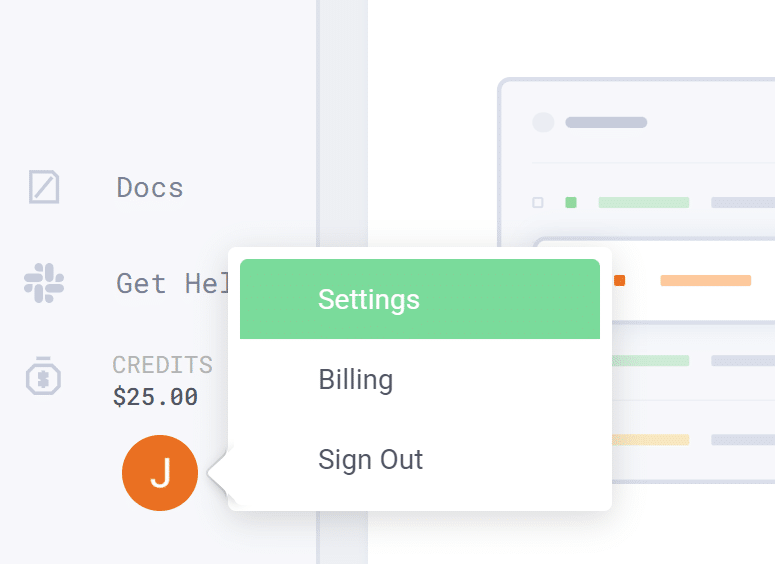
At the bottom left of the Grid window, click on your circle profile icon in the navigation bar and select Settings.

Grid Settings

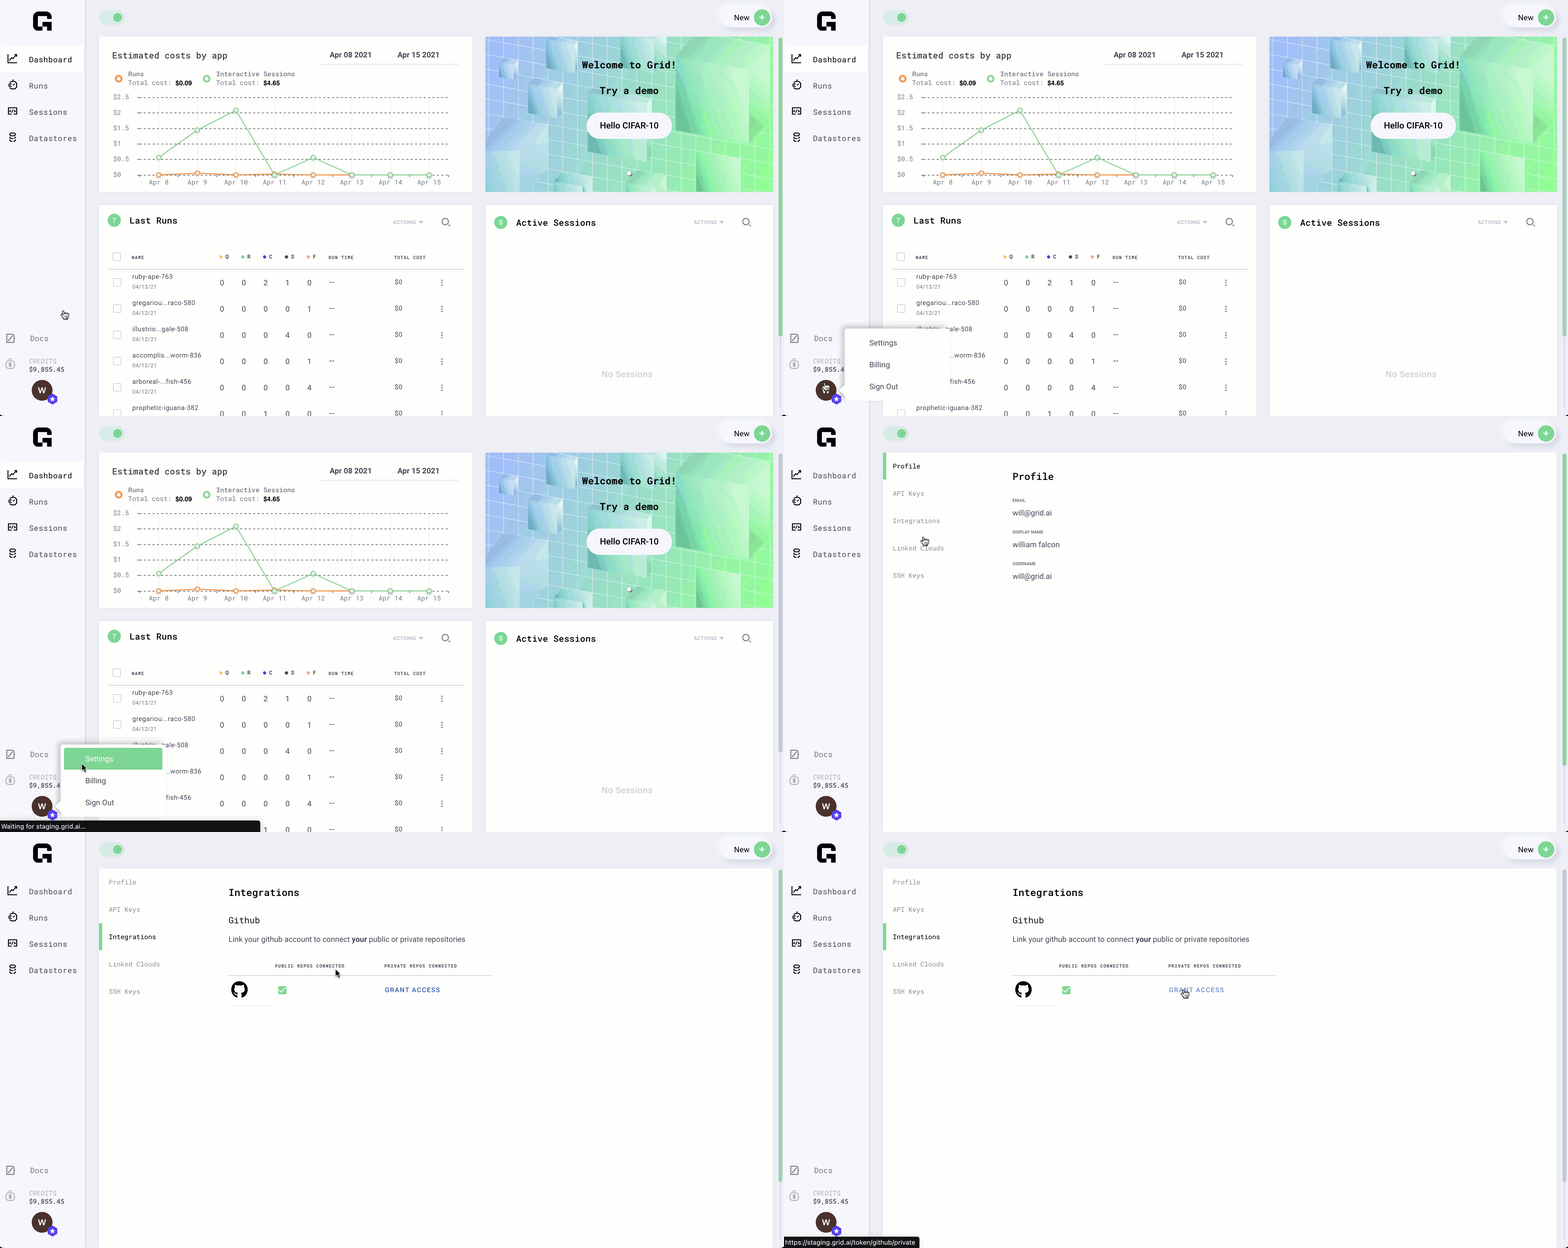
You can add an ssh key as well as grant access to GitHub repositories using this page.

Grid Profile

Step 4: Integrating with GitHub


To harness the full power of Grid, it is important to integrate your GitHub account with your Grid account. This will enable Grid to utilize your public repositories for training. You also have the option to give Grid access to your private repositories. By default, Grid will not have read/write access to your private repositories.

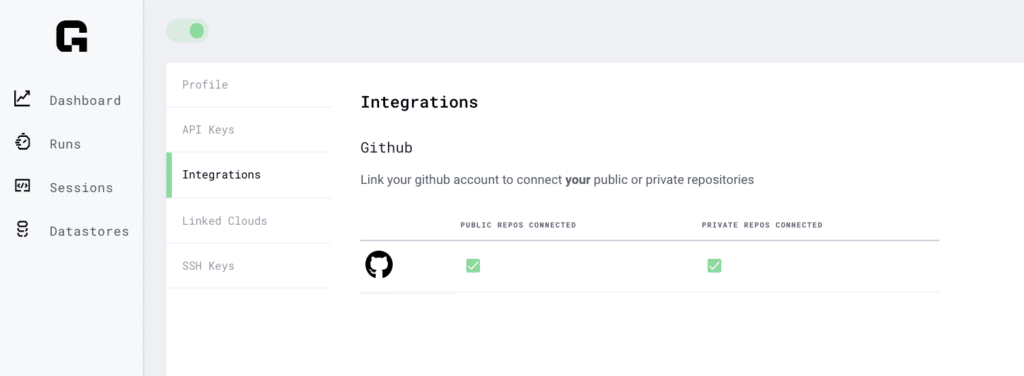
To grant Grid read access to your private code, navigate to Settings > Integrations > Grant access. Grid does not save your code, look at it or compromise its privacy in any way.

Grant GitHub Access

GitHub Integration

Note: If you logged in with Google, you will need to link a GitHub account and grant access to your repos.

Google Login

If you signed up to Grid with GitHub, you’ll already be logged into your GitHub account.

GitHub Login

Grid Run localdir Option

Currently, Grid has a native GitHub integration which allows you to run code from public or private repositories. There is currently no support for integration with other code repositories providers such as BitBucket or Gitlab. 

We provide the –localdir feature within Grid run to allow users to run scripts from an arbitrary local directory, regardless of where that code is hosted. The main benefit of this feature is for users that do not need to grant Grid access to their code repository accounts. Below is an example usage of the grid run –local dir option.

grid run --localdir run.py

And that’s it! You’ve taken the first steps toward setting up Grid. You’re now ready to start using its exciting features.

Your $25 in free credits should be available to you shortly, once we’ve confirmed your registration. You can view how many credits you have at the bottom left of the Grid window.

As always, Happy Grid-ing!

You can find more helpful tutorials on our blog, or you can explore our documentation. You can also join the Grid Slack community to learn more about what the Grid platform can do for you, and collaborate with other users and Grid team members.